|
Configuring Eudora Pro 4.0 To Access The Campus Modem Pools
If you accessed the Telnet-only Modem Pool to receive and send email before the pool was retired in early February, you will need to switch to one of the three campus modem pools (the Student/Staff Modem Pool, the Faculty Modem Pool, or the Legacy Modem Pool). If your computer is not already set up to connect to one of these pools, refer to the instructions available on the Web at http://itexpress.ucdavis.edu/modems.html. To access the campus network, you will also need to change your Eudora settings in order to send and check email. To do so, follow the instructions below.
Requirements
Before you configure Eudora to access one of the campus modem pools, you will need to verify that you have:
- A New-style UCD LoginID.
- A Kerberos password.
- The appropriate ServiceID for the modem pool you wish to access. (You need to obtain the IRAS ServiceID to access the 56K Student/Staff Modem Pool, and the IRMP ServiceID for the Faculty Modem Pool. The IMOD ServiceID associated with the 14.4K Legacy Modem Pool is automatically assigned to all UC Davis affiliates.)
To acquire a new-style UCD LoginID, Kerberos password, and ServiceIDs, from your Web browser, go to the "Telnet Connections to mothra.ucdavis.edu" Web page at http://mothra.ucdavis.edu/UCDLoginID/telnet.html and click on the telnet://mothra.ucdavis.edu link. When you are connected to Mothra, type "services" at the login prompt, press Return (or Enter) to bring up the Mothra Services Menu, and select service option "G" to add one of the modem pools' ServiceIDs to your account. If your campus computer account does not have a New-style UCD LoginID or a Kerberos password, the system will prompt you to choose one. If you experience difficulty or prefer to talk to a technology consultant, drop by IT Express in 182 Shields Library or call (530) 754-HELP.
- Internet communications software installed on your computer. Look for Dial-Up Networking for Windows 95 and 98, or for the Mac, either MacTCP and FreePPP or Open Transport TCP/IP and Open Transport PPP. (These can be downloaded from the Web at http://itexpress.ucdavis.edu/modems.html.)
- Version 4.0 (or a later version) of Eudora Pro. If it isn't already installed on your computer, you may download it free of charge from the UC Davis Software Web site http://software.ucdavis.edu/ or you may purchase Bovine Online, an Internet kit which includes Eudora Pro 4.0, other Internet applications, and a manual, all of which are customized for computing at UC Davis. The package sells for about $20 at the UC Davis Bookstore Computer Shop.
Instructions for Configuring Eudora Pro 4.0
If you meet all the requirements listed above, you will be able to configure Eudora using the instructions below. You will be prompted to enter or verify information about:
- Your UC Davis computing account
- The email server (known as Mail Host or Delivery Host) to which your account has been assigned
- The Simple Mail Transfer Protocol (SMTP) Server associated with your account (Step 11 below will help you determine what your SMTP server is).
To configure Eudora Pro 4.0, follow these steps:
- Look up your personal campus computing account information by using the campus Whois Service. Go to http://www.ucdavis.edu/cgi-bin/whois/ and type in your last and first names, then press Return. You will see a screen similar to the one below, but with your personal information. Example:
       Name: Bessie The Cow
       Email Address: btcow@ucdavis.edu
       Delivery Host: mailbox.ucdavis.edu
       UCD LoginID: bovine
- After printing or writing down this information, start Eudora Pro.
- Select Tools from the main menu (Macintosh users, click on Special).
- Select Options from the drop-down menu (Macintosh users, select Settings).
- Then click on the "Getting Started" icon on the left hand side of the window (see graphic below).

- From here, verify that your Username and Mail Server on the screen match the information presented in your Whois screen (see steps 1 and 2).
- Your Mail Server from the Getting Started Settings screen must match the Delivery Host.
- If you find a discrepancy, adjust the settings within Eudora Pro to match the information shown in the UCD Whois screen.
- At this point, your settings for checking email are configured.
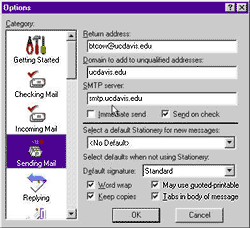
- To check your settings for sending email, click on the Sending Mail icon in the left scroll-down menu underneath the Getting Started icon (see graphic above).
- Using the table below, verify that your SMTP Server box (the third box from the top of the screen) is filled in appropriately.
Delivery Host
(from Whois Service) |
Corresponding SMTP Server
(in Eudora Settings) |
|---|
| blue.ucdavis.edu | blue.ucdavis.edu |
| green.ucdavis.edu | green.ucdavis.edu |
| mailbox.ucdavis.edu | smtp.ucdavis.edu |
| scarlet.ucdavis.edu | scarlet.ucdavis.edu |
| yellow.ucdavis.edu | yellow.ucdavis.edu |
- Once you have verified the SMTP Server settings for sending email, click the OK button.
You should be all set to receive and send email through the campus modem pools. If you experience difficulty with any of these steps, contact IT Express at (530) 754-HELP or drop by 182 Shields Library.
|
|

